

Access to clean water is essential for health and well-being, making effective water filtration a priority for many households. DIY water filtration systems can provide an affordable and efficient solution for purifying water stored in home water tanks. This article will guide you through the process of creating a DIY water filtration system tailored to your needs.
Water Filtration:
Water filtration removes impurities and contaminants from water, ensuring it is safe for drinking, cooking, and other household uses. Common contaminants include bacteria, sediments, chlorine, heavy metals, and other harmful substances. A well-designed filtration system can significantly improve the quality of your water.
Benefits of DIY Water Filtration:
Cost-Effective: Building your own filtration system can save money compared to purchasing commercial systems.
Customizable: You can tailor the system to your specific needs and the quality of your water source.
Sustainability: DIY systems often use readily available materials, promoting an eco-friendly approach.
Components of a DIY Water Filtration System:
To build an effective DIY water filtration system for your home water storage tank, you’ll need the following materials:
Filter Media:
Gravel: Acts as a coarse filter, removing larger particles.
Sand: Serves as a finer filter, capturing smaller sediments.
Activated Charcoal: Removes chemicals, odors, and impurities, improving taste.
Cotton or Coffee Filters: Used to catch larger debris before water flows through the media.
Container:
A large plastic or metal container can serve as the filtration unit. It should be clean and free from contaminants.
Tubing and Valves:
Flexible tubing for water inflow and outflow, along with valves to control the flow.
Support Structure:
A stand or frame to hold the filtration unit in place.
Step-by-Step Guide to Building a DIY Water Filtration System:
Step 1: Prepare the Container
Clean the container thoroughly to remove any residues or contaminants.
If the container has a lid, consider drilling a small hole for the inflow tubing.
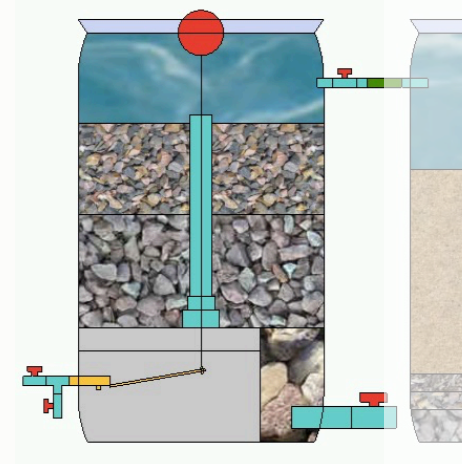
Step 2: Layer the Filter Media
Gravel Layer:
Pour a layer of gravel at the bottom of the container, about 2-3 inches thick. This layer prevents larger debris from clogging the system.
Sand Layer:
Add a layer of sand, about 2-3 inches thick, on top of the gravel. Sand captures finer particles.
Activated Charcoal Layer:
Place a layer of activated charcoal, approximately 1-2 inches thick, above the sand. This layer will remove chemicals and odors.
Final Layer:
Use cotton or coffee filters on top of the charcoal to catch any remaining larger particles.
Step 3: Install the Tubing
Attach the inflow tubing to the top of the container, ensuring it allows water to flow through the filter media.
Connect the outflow tubing to the bottom of the container for filtered water.
Step 4: Set Up the System
Position the filtration system above the water storage tank, ensuring that the outflow tubing directs the filtered water into the tank.
Use valves to control the flow of water entering and exiting the system.
Step 5: Testing and Maintenance
Test the System:
Before relying on the system for drinking water, test the filtered water for contaminants. Use home testing kits available at hardware stores.
Regular Maintenance:
Check the filter media periodically. Replace or clean the sand, gravel, and charcoal every few months, depending on water quality and usage.
Additional Tips:
Pre-Treatment: If your water source has high levels of sediments, consider adding a pre-filter stage with a mesh screen.
UV Treatment: For additional purification, consider using a UV light treatment unit after the filtration system to eliminate bacteria and viruses.
Storage: Store filtered water in clean, sanitized containers to maintain its quality.
Conclusion:
Creating a DIY water filtration system for your home water storage tank is a practical and cost-effective way to ensure access to clean water. By using simple materials and following a straightforward process, you can significantly improve the quality of your water. Regular maintenance and testing will help you achieve the best results, providing peace of mind for you and your family. Embrace this sustainable solution for a healthier home!